:max_bytes(150000):strip_icc():format(webp)/spruce-crafts-header-illo-1fcc1cb416554246b2063d9fe26fb24f.png)
:max_bytes(150000):strip_icc():format(webp)/dog-coat-1144641_1920-58e6a4405f9b58ef7efb573e.jpg)
Keep your pup warm, toasty, and dry in winter or wet weather by sewing a cute little coat with this pattern. Your furry friend will stay cozy and comfortable while out on a walk and look sweeter than ever. This pattern fits small dogs, but you can alter the materials and instructions to sew a coat that fits your pet.
What You'll Need
Equipment / Tools
- Printer
- Paper
- Tape
- Paper scissors
- Fabric scissors or pinking shears
- Sewing machine
- Sewing pins or clips
- Iron (optional)
- Ballpoint or jersey sewing machine needles, if available
Materials
- 5/8 yard water-resistant fabric, such as windbreaker nylon
- 5/8 yard plush fabric, such as sherpa or fleece
- 5/8 yard cotton or polyester batting, to add extra warmth (optional)
- 1/4 yard 2-inch wide hook-and-loop tape (match the color to your fabrics if possible)
- Thread to match the outer fabric
- Reflective tape/strips (optional)
Instructions
-
Gather the Materials
If possible, match the hook-and-loop tape color to the fabric (in this case, black for the exterior and white for the lining). The tape in the sample is double-sided, eliminating the waste of one side of the tape in each color. Choose the correct thread and sewing machine needle for your materials.
For best results, read through all the instructions before beginning.
![Small Dog Coat Sewing Supplies]()
Mollie Johanson -
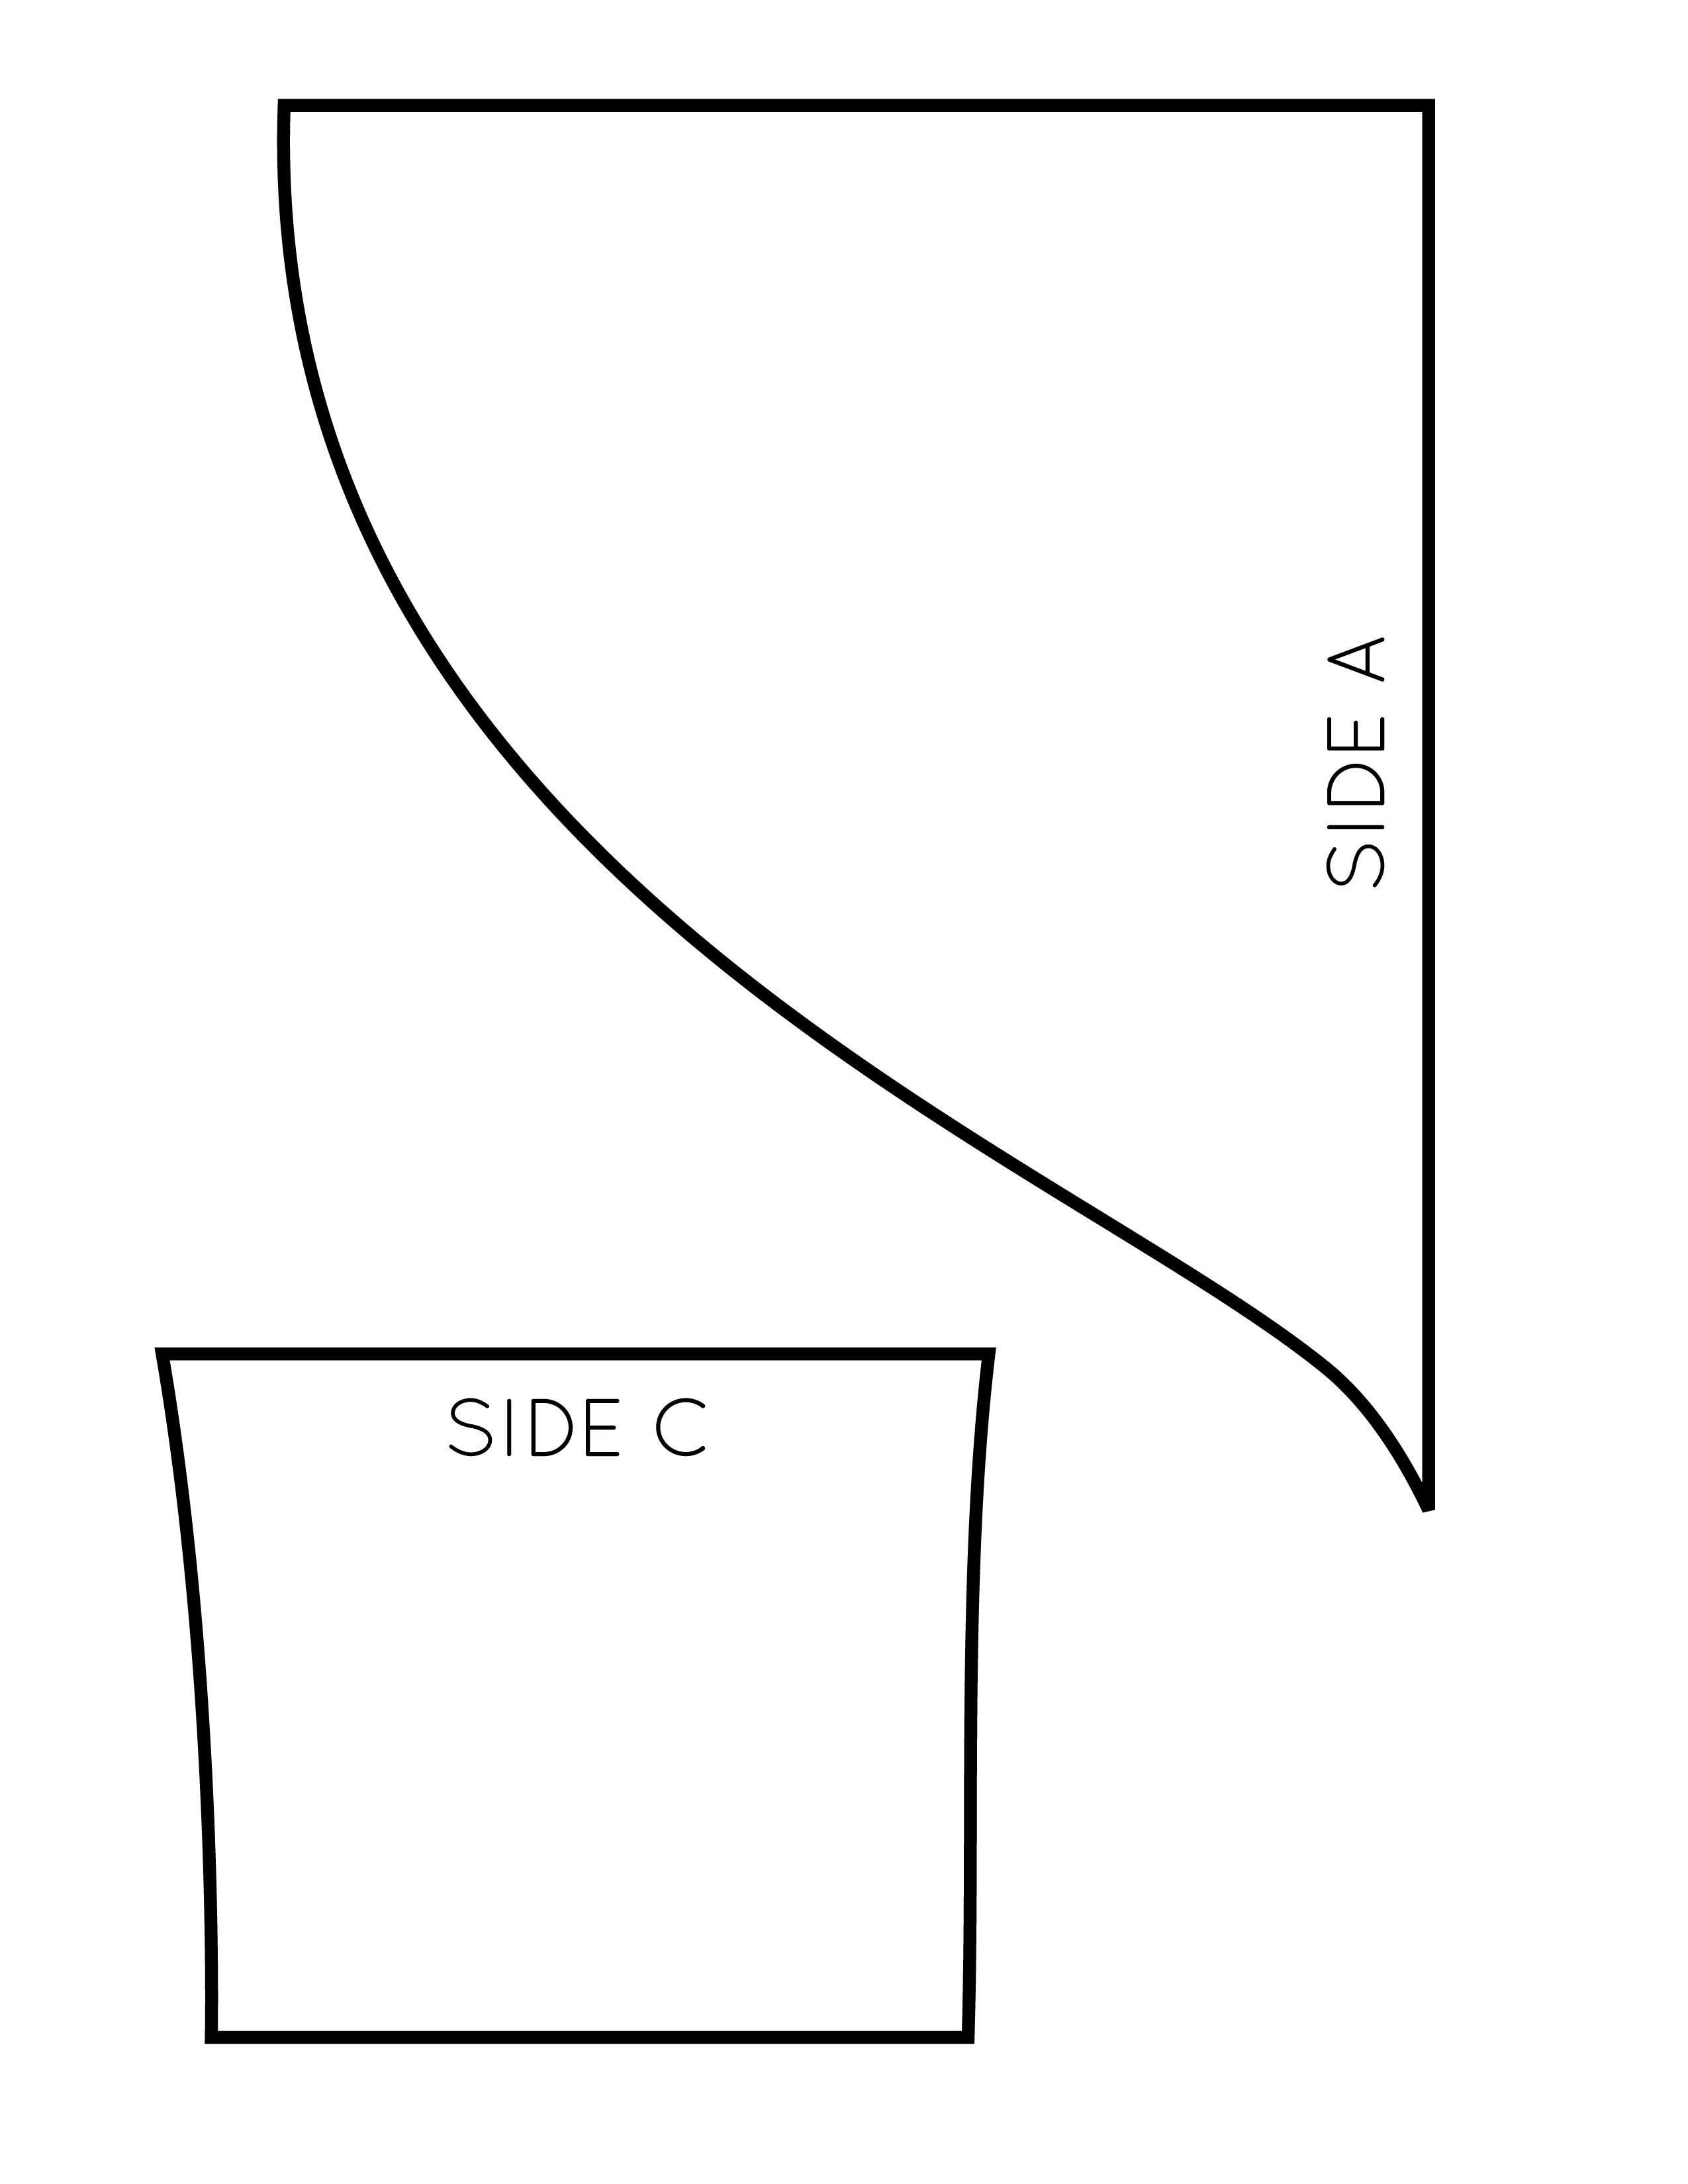
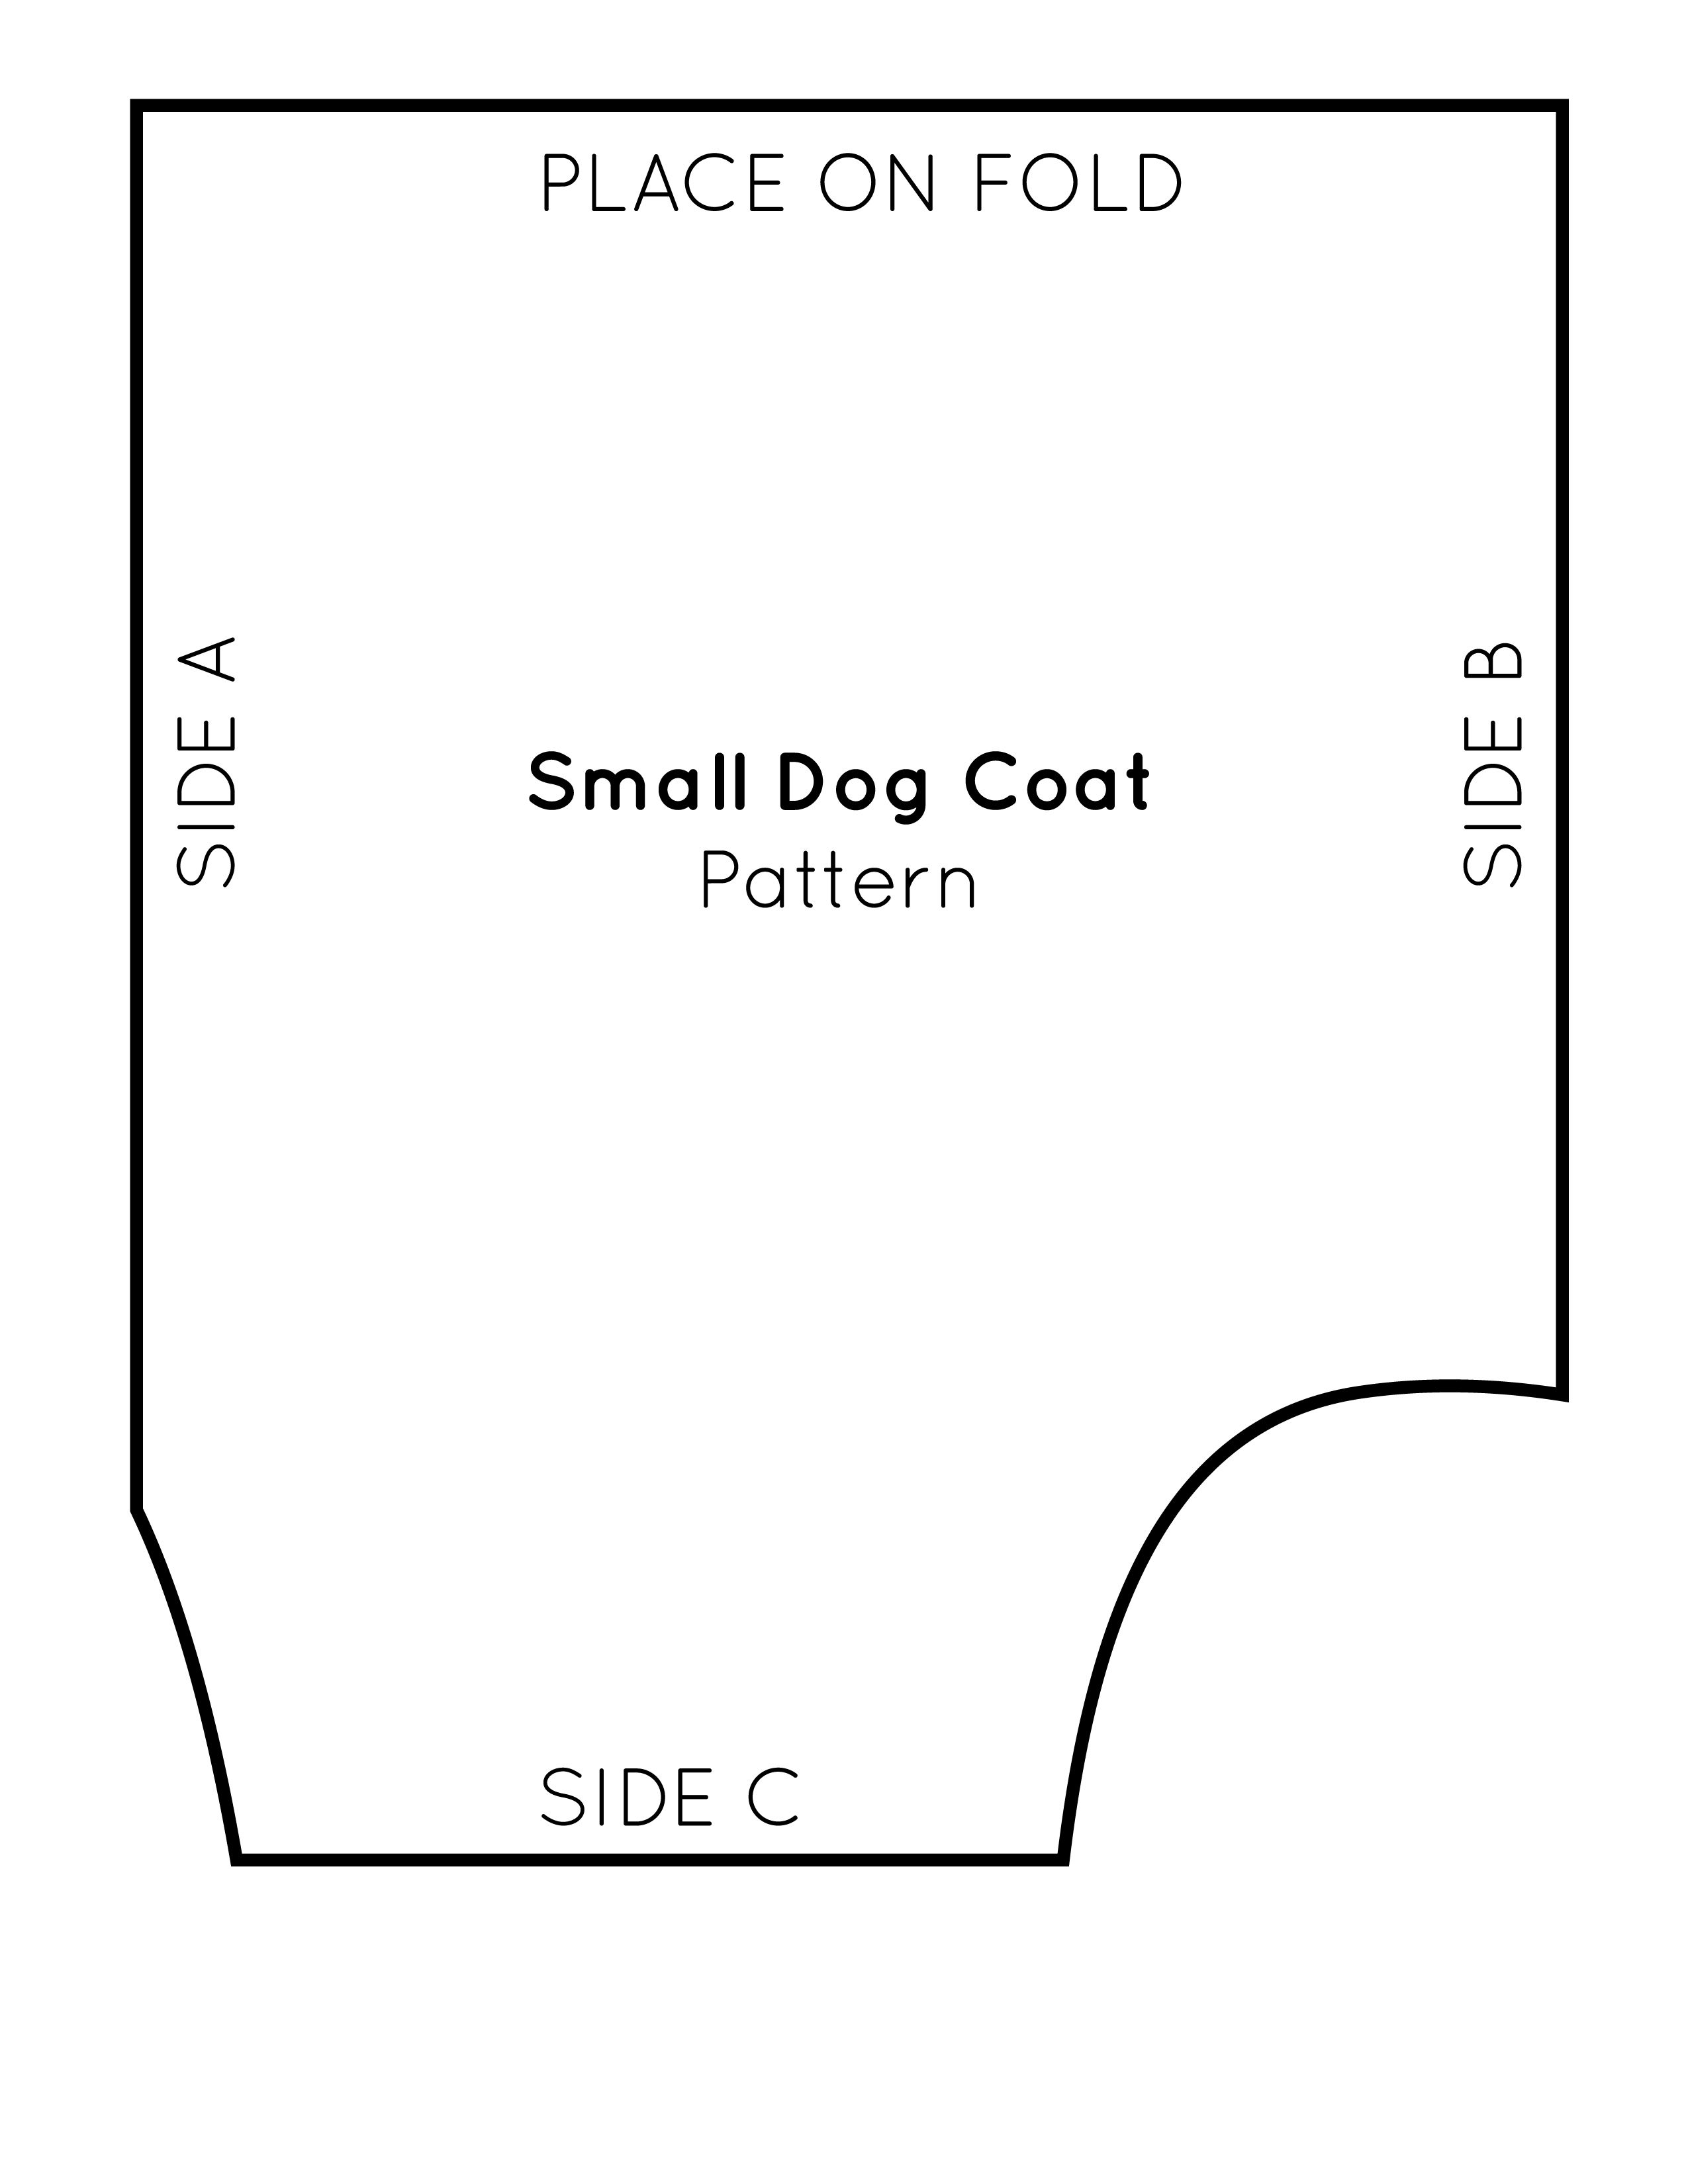
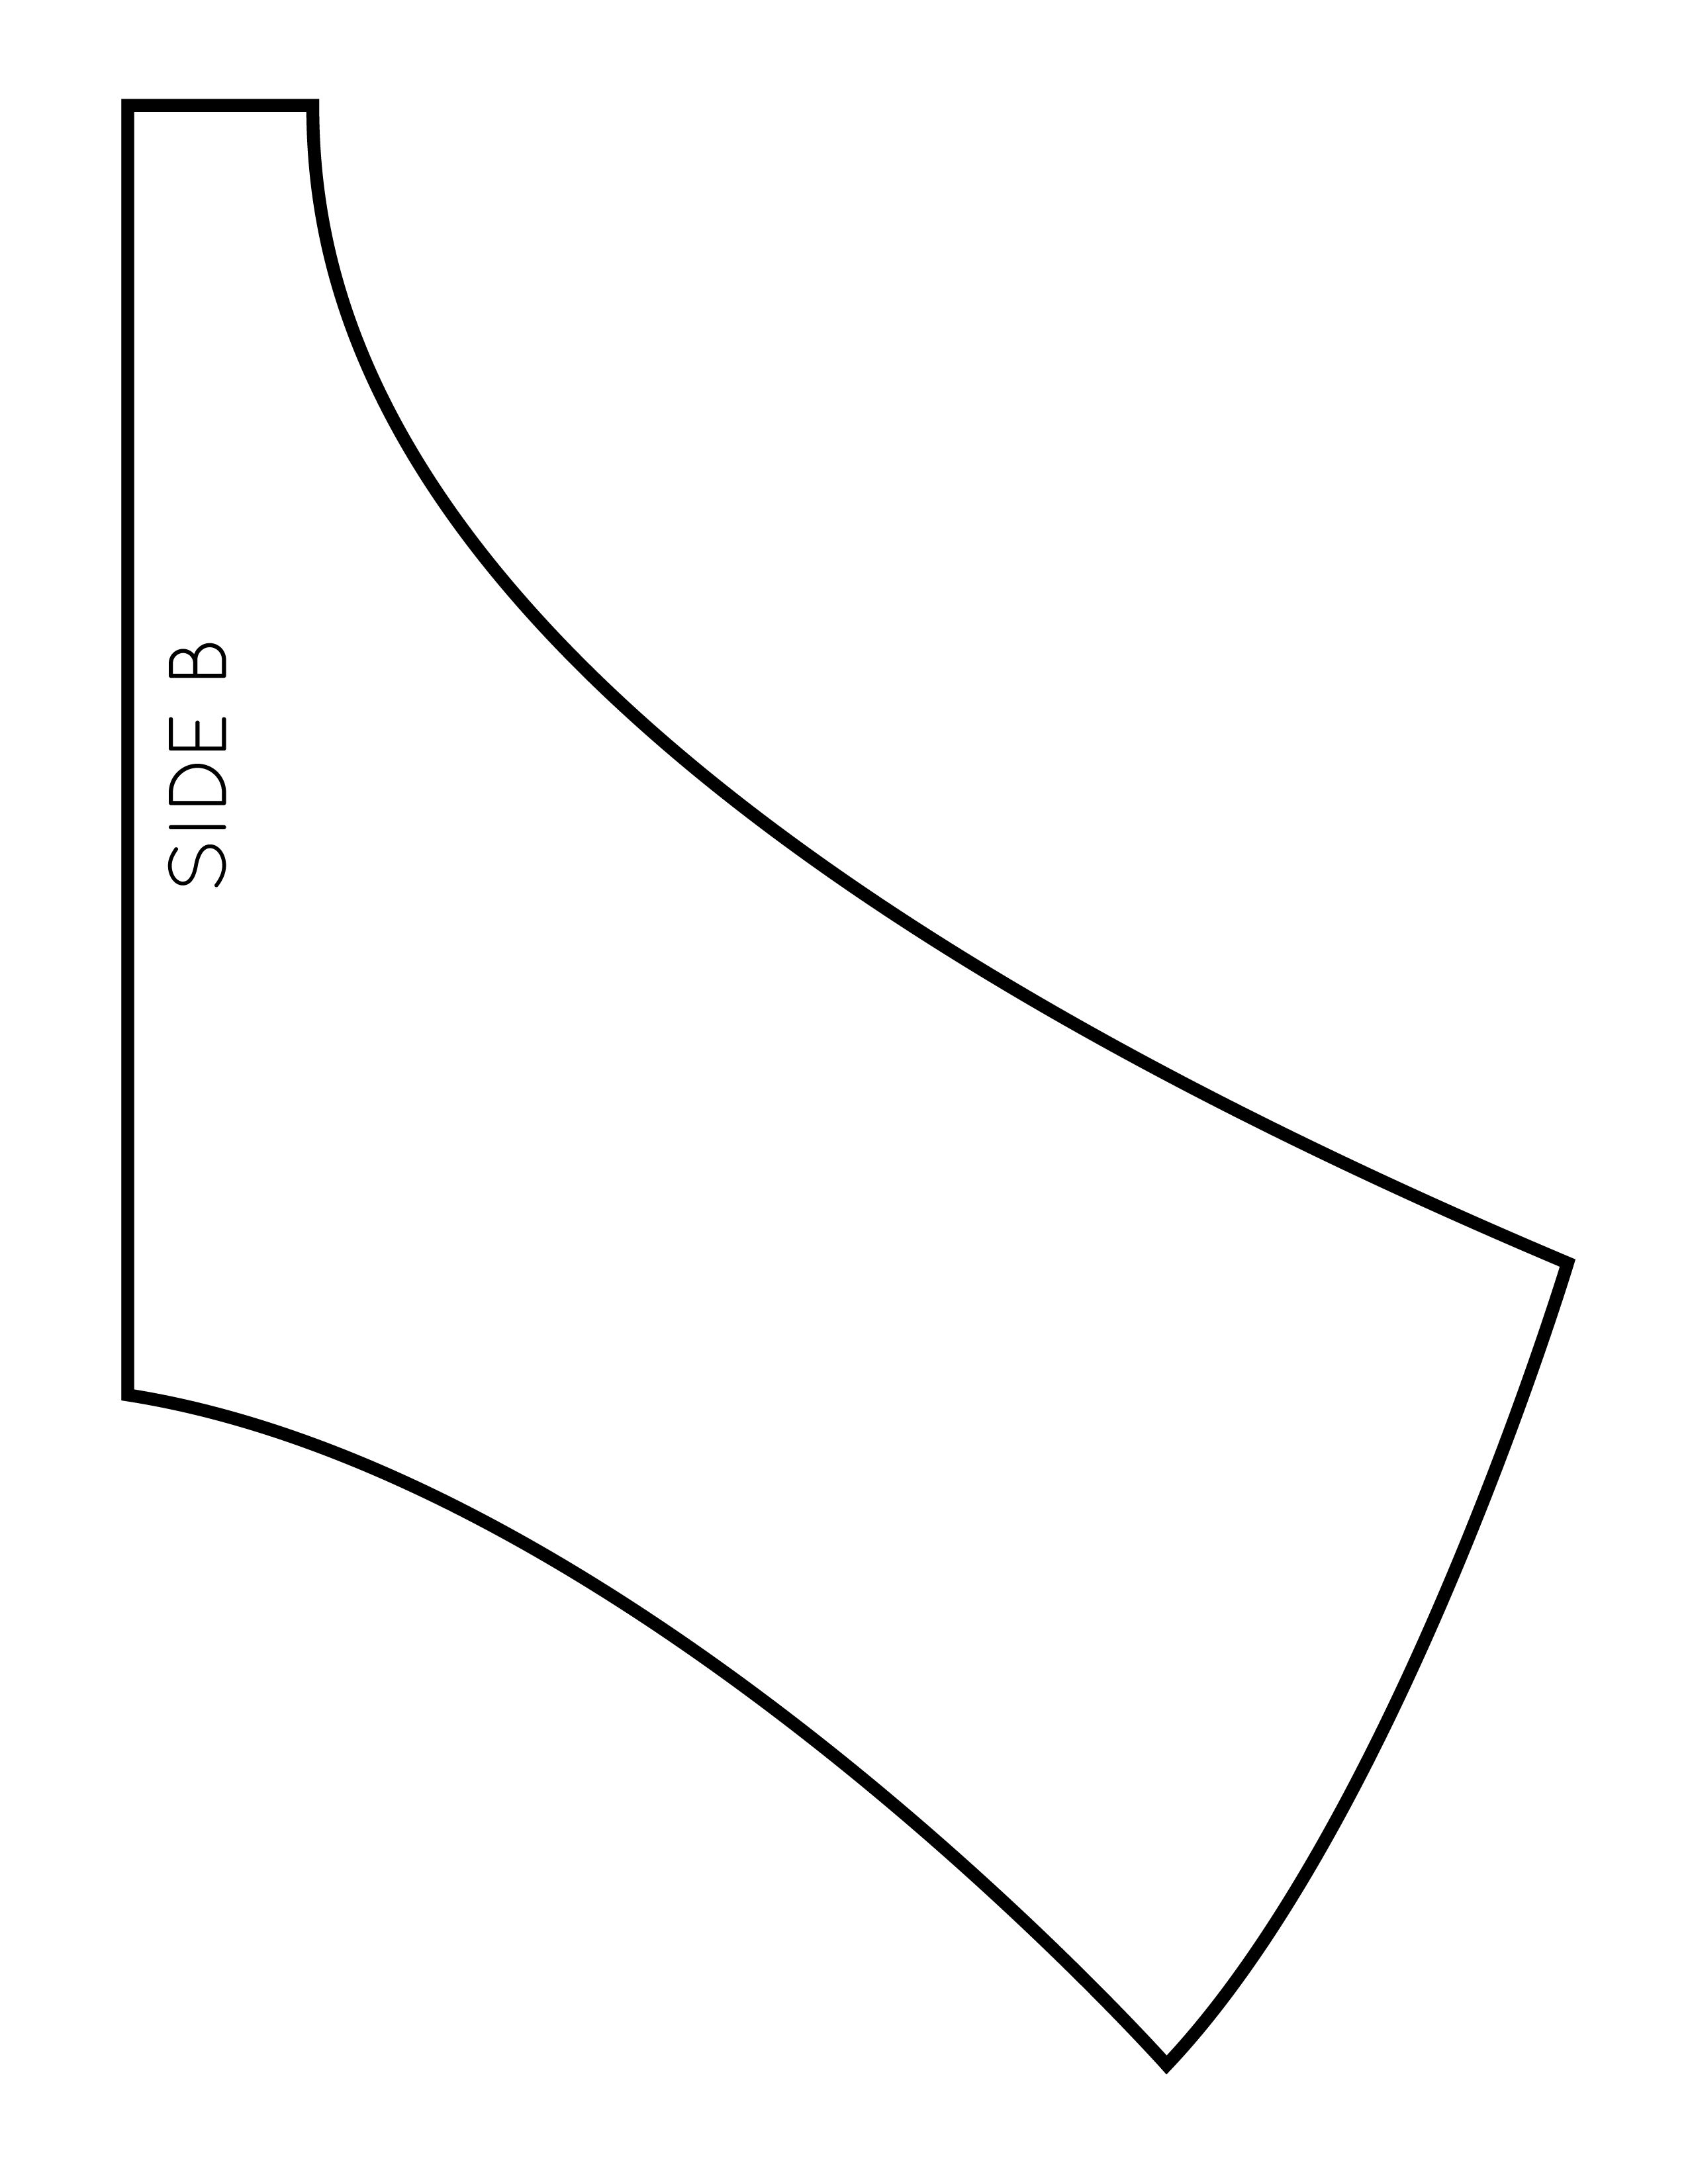
Print and Prepare the Dog Coat Pattern
Download and print the pattern pieces:
Print the pieces at 100% (actual size) or as close to 100% as possible (print all the pieces at the same size so they fit together).
Tape the small pieces to the large piece, matching the letters, and cut out on the outer line.
![Assemble the Pattern Pieces]()
Mollie Johanson -
Cut the Layers
Fold the exterior fabric into a double layer, matching the selvages. Place the pattern on the fold, following the marking, and cut one piece.
Repeat with the lining fabric. If cutting through two layers is difficult, open the fabric, cut around one side of the pattern piece, and then flip it along the 'Place on fold' line to cut the other half.
Note: The fabric grain must be straight on the fold (straighten it by measuring the distance of the selvage to the fold and keeping the distance even).
Optional: To add extra warmth to your dog's coat, cut a matching piece out of batting and quilt the batting to the outer fabric before sewing the layers together.
-
Pin and Sew the Layers
Pin the outer and inner pieces, right sides together, aligning the edges. If you're working with a vinyl fabric, use clips instead of pins, since straight pins will pierce the vinyl and ruin the waterproof qualities. Don't have clips? Pin parallel to the edge, within the seam allowance.
Stitch the layers together using a 3/8-inch seam allowance, leaving an area open for turning.
![Cut and Pin the Coat Layers]()
Mollie Johanson -
Turn and Topstitch the Coat
Clip all the curves and trim the corners to reduce bulk. Turn the dog coat right side out through the opening.
Poke the corners into shape and make sure all the seams are open. Press the seams if desired, ensuring the iron is set to the correct temperature for your fabric. You can also finger-press to flatten the edges.
Fold the seam allowance in along the opening, clipping if needed. Pin the opening closed.
Topstitch the edges of the entire coat, using matching thread, sewing the opening closed at the same time.
![Top Stitch Around the Dog Coat]()
Mollie Johanson -
Attach the Hook-and-Loop Tape
Cut two pieces of the hook tape (scratchy side) 2 1/2" long for the exterior tabs. Then, cut two pieces of the loop tape (soft side) 2 1/2" long for the lining tabs.
Pin or clip the tape pieces to the corresponding tabs on the dog coat, as shown below.
Stitch the hook-and-loop tape in place, using thread that matches the coat's outside.
![Sew the Hook and Loop Tape]()
Mollie Johanson
:max_bytes(150000):strip_icc():format(webp)/SmallDogCoat1-5a70b503d8fdd50036ea3bce.jpg)
:max_bytes(150000):strip_icc():format(webp)/SmallDogCoat2-5a70b4f90e23d900369a2396.jpg)
:max_bytes(150000):strip_icc():format(webp)/SmallDogCoat3-5a70b4fe6edd6500365dd068.jpg)
:max_bytes(150000):strip_icc():format(webp)/SmallDogCoat4-5a70b5001f4e130037550669.jpg)
:max_bytes(150000):strip_icc():format(webp)/SmallDogCoat5-5a70b4f56edd6500365dcefc.jpg)
Make It Extra Special
Your dog coat is finished and ready for your precious pup to wear on a walk! Keep your coat as-is or customize it with one of the options below.
- Sew on reflective strips so your dog is visible while walking at night or on rainy days.
- Embroider your dog's name on the back of the coat.
- Sew a little pocket on the coat and store your contact information inside.
- Stitch a cute tag into the seam for a fun detail.
:max_bytes(150000):strip_icc():format(webp)/Christmas_NanaCompany-5a1da63c89eacc0037c948ca.jpg)
:max_bytes(150000):strip_icc():format(webp)/little-girl-room-detail-185505242-7774a04f08574e87b2f0d39c9036e306.jpg)
:max_bytes(150000):strip_icc():format(webp)/StuffedPumpkin1-59dbc9f103f40200104a6e86.jpg)
:max_bytes(150000):strip_icc():format(webp)/ElfShoes1-5bb1477b46e0fb0026dd19c7.jpg)
:max_bytes(150000):strip_icc():format(webp)/FleeceStocking1-5a0f7f1ada271500371543cf.jpg)
:max_bytes(150000):strip_icc():format(webp)/GettyImages-1346636854-crop-4d97d41db5c44f76ab27f79feaa9cfa8.jpg)
:max_bytes(150000):strip_icc():format(webp)/DogBoneToy1-5a9b16ad0e23d90037550882.jpg)
:max_bytes(150000):strip_icc():format(webp)/Throwpillowsondaybed-GettyImages-159117614-5942a02d5f9b58d58a476a47.jpg)
:max_bytes(150000):strip_icc():format(webp)/Womansshawl-GettyImages-654400393-59bac8ec519de20010ed899e.jpg)
:max_bytes(150000):strip_icc():format(webp)/ToothFairyPillow1-5a872ca1c673350037be4c2e.jpg)
:max_bytes(150000):strip_icc():format(webp)/SnuggleBlanket1-5b1018d3fa6bcc0036a74815.jpg)
:max_bytes(150000):strip_icc():format(webp)/GettyImages-105932225-c4bc97c275db44a6b48a05b3625735c4.jpg)
:max_bytes(150000):strip_icc():format(webp)/GettyImages-578215053-5875ab8b3df78c17b63dfe93.jpg)
:max_bytes(150000):strip_icc():format(webp)/LeatherBags_BoxwoodAvenue-75691b94dcca4dc8a9eff22e22134c90.jpg)
:max_bytes(150000):strip_icc():format(webp)/GettyImages-502321974-3184e8aea59d43b098cfadbf6e70bdee.jpg)
:max_bytes(150000):strip_icc():format(webp)/GettyImages-1289031993-b2cc59a627514b5a8cd158be4db29bb7.jpg)